I told myself that I was going to take some time off right before I have the new little one and get my king size quilt done. More on the quilt later but I decided on the pattern Firework by Thimble Blossom. I love all of her patterns and fabric but this was our (hubby and mine) favorite.
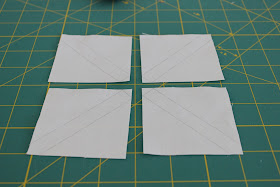
But I am making a king size quilt and needed a lot of flying geese for the quilt, see all the cut squares a lot of flying geese. To make things a little easier I decided to make them by using the No-Waste Flying Geese method. I know you can find the tutorial all over the internet but I wanted to show how I made them.
I needed my finished flying geese to be 2" x 4" (this is completely finished)
CUTTING & TRACING:
This will make #4 flying geese
Choose two contrasting fabric for you flying geese. Select which fabric will be your center triangle and which will be your side wings of the triangle.
For the center triangle, establish how wide your finished geese will be. Example: my flying geese needed to be 4"- add 1 1/4" to this which would be 5 1/4", then you would cut a square that is 5 1/4".
For the side wings of the triangle, establish how tall your finished geese will be. Example: my flying geese needed to be 2"- times 2" by 2 = 4 then add 1 3/4" to this which would be 5 3/4", then you would cut a square that is 5 3/4".
Now take the 5 3/4" (larger square) and trace a stitch line on the WRONG side of the fabric.
Using a ruler, mark a line 1/4" from the center of the square, one corner to the other corner. Rotate your square and mark again so it looks like this.

Then rotate square to mark the other corners the same way.
Now that the lines are marked, you will cut the square into smaller squares.
Cut the square exactly in half making two rectangles. (Example: measures 2 7/8" x 5 3/4")

Then cut each rectangles in half, making 4 squares. (Example: measures 2 7/8" x 2 7/8")

SEWING:
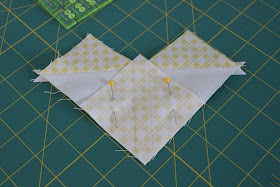
Place two marked squares (2 7/8") onto the larger square (5 1/4") with right sides together, making sure the marked lines are lining up (they will overlap at the center).

Stitch directly on both marked lines.
Then cut right down the middle of the stitched lines.

Press toward the smaller triangles (the pattern I am using suggest pressing seams open).
Place the last remaining squares on each half, making sure corners line up.

Stitch on both marked lines for each half, again.
Then cut right down the middle of each half.

Press open and you will have 4 flying geese.
You then will want to trim all the flying geese.
Here is a picture off all my flying geese for this quilt. That's #600 to be exact, a lot of flying geese...
Most of my flying geese are trimmed and one color is all sewn together. This part of the quilt is almost done...


No comments :
Post a Comment