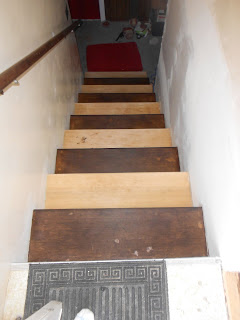
After removing the carpet (here) and stripping the varnish (here), the stairs were ready to be sanded.
Items needed to sand stairs:
(After sanding, I changed my mind on some things pictured
but if I did this again everything is listed below)
-60 Sandpaper (Large Package)
-80 Sandpaper (Large Package)
-120 Sandpaper (Large Package)
-Medium Sanding Block (Has 4 sides)
-Fine Sanding Block (Has 4 sides)
-Stainable Wood Filler
-Putty Knife
-Mask
-Orbital Sander
-Mineral Spirits (Optional)
-Cloth
-Shop-Vac
-Brush (pictured below)
I wanted to show everyone the difference between the sandpapers.
Left to Right: 60, 80, 120
very important step: Apply wood filler first before any sanding. Let filler dry, I let it dry for about 24 hours to make sure everything was dry because I had a really big hole to fill.
NOTE to why you should apply filler first, another mistake by me. I sanded the stairs then applied the filler then sanded that down until it was smooth. I then cleaned the stairs (I will explain how to do this) and applied my stain.
My stairs were blotchy all around were I applied the wood filler. Looked really bad and I was freaking out. I applied a second coat (top stair) and still did not help. How was I going to fix this?
After doing lots of research online, I found out that wood filler leaves a residue, like a glue, unless it is really sanded down.
One way to see if you have removed all residue from the stairs is to clean with Mineral Spirits. I had to try this and see the difference.
Once again I was back to sanding.How to Sand Stairs
First put your mask on before any sanding.
When sanding stairs you want to start with the 60 sandpaper and sand everything (you will use a lot of sandpaper). So put our 60 sandpaper on your orbital sander and go to town (make sure you buy the right sandpaper for your sander and follow your sanders directions on how to use). Next you will move to the 80 then the 120 sandpaper. Just work your way up from the course to the fine sandpaper. Please save yourself some time and start with the 60, it makes all the difference because you will maybe still have a little bit of varnish still on the stairs. After sanding with the sander, move to the block sander. Start with the medium and sand all the corners that your electric sander could not get. Then move the fine block sander and do the same thing. The stairs should now be very smooth and is ready to be cleaned.
Picture of my stairs all sanded for the second time, it was OK that I did not sand all the stain off because I was staining the same color. I just had to fix the blotchy stain problem.
Here is a pile of all the sand paper I went through for this project. (I make a lot of mistakes)
Next you will get out your Shop-Vac and brush (Pictured below, you really only need the little brush, toothbrush would work). Vacuum the stairs then with the vacuum still on, take the brush and clean the corners holding the vacuum hose right next to the brush to get all the dirt/dust (Sorry no picture, I needed both hands for this).
After all the stairs are vacuumed, they need to be cleaned with Mineral Spirits or you can also clean with damp cloth. I still cleaned my stairs with a damp cloth and worked just fine.
Here are my stairs all cleaned, ready for the stain.
NEXT is Staining Stairs, here


No comments :
Post a Comment